Let’s admit it. Mistakes happen. You probably deleted that text message on your iPhone by simply swiping left unknowingly and now, you are wishing you can have it back. Right?
Or, maybe you purposely deleted the message and now, you wish you never did and you are wondering how to get it back. Again, right?
Or… OK, I get it. You are probably getting bored at this point so, let’s just hit the hammer on the nail.
By default, there are ways you can actually recover those sms messages if your phone is being actively back up the cloud via services like iCloud. There are also options that allows you back up your iPhone to your computer.
But, what if you do not have a back up running on your iPhone? What if as a result of limited storage, your iPhone couldn’t be backed up and now, you are stuck with being unable to recover those deleted messages?
Guess what? There’s hope! Or, should I say, there’s light at the end of the tool :-D.
There are a few tools which promises being able to recover deleted messages on iPhone. One of such tool, is PhoneRescue.
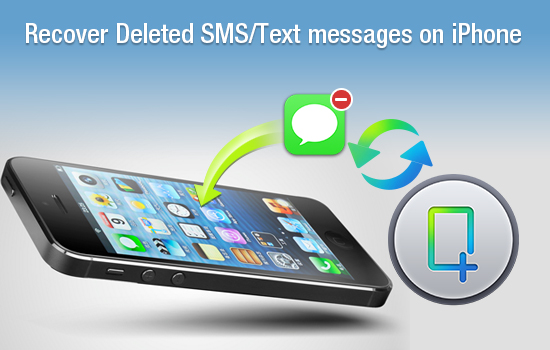
How To Recover Deleted Text Messages On iPhone?
The good guys at iMobie sent me one of their awesome software tools to try out. This tool is said to help you retrieve deleted SMS on android and iPhone and right here, we are practically (together) going to try this tool out in retrieving deleted messages on an iPhone.
For this case study, I will be using my personal iPhone. But just before you grow a second thought, I will really suggest you take out time to follow this post and follow all the steps prescribed.
As the title has it, this is a complete beginner’s guide on how to recover deleted messages on iPhone.
This is going to be different from most tutorials you must have read on the subject matter. Definitely going to be longer than every other tutorial i have written on this blog. Why? Because it is going to be more practical. I will be as practical as possible and we’d arrive at the end result together.
The main goal here is, being able to communicate with every newbies to stuffs and tools like this. We will be discussing from downloading to installation to the end game which is retrieving deleted sms messages on an iPhone.
If you feel like you are more advanced and only need the guide to having this done, below is a table of content. Use that in quickly navigating to the post title you are more interested in. Otherwise, you are welcome to follow us in this ride and also, contribute if need be.
Table Of Contents
Are you with me? Let somebody shout hallelujah! 😀
Step 1: Downloading PhoneRescue For iOS Tool on Windows
The first step would be downloading and Installing the tool. Not to worry, we will be coming to the part where I will delete SMS on the iPhone. Like I said, it’s going to be all practical.
To download PhoneRescue on your computer (yes, you need a computer), click here.
On the download page, you’d find two major download options – iOS and Android.

If you’d like to retrieve deleted messages on your android phone, you should download PhoneRescue for android software on your Windows or Mac PC. For iOS, choose the PhoneRescue for iOS download option.
Since an iPhone is what we’d be using as our case study here, iOS it is. For the two major platforms, there are two download options – Windows and Mac.
I personally use a Windows PC. Precisely one running windows 10 and for that reason, I will be choosing the Free Download compatible with All Windows option.
In summary, download the tool for iOS if you intend achieving the major recovery on iPhone or iPad. For android, choose the android tool version.
Step 2: Installing The Tool On A Computer
First off, the size of the file is very lightweight. We are talking about 0.99 MB for the iOS version.
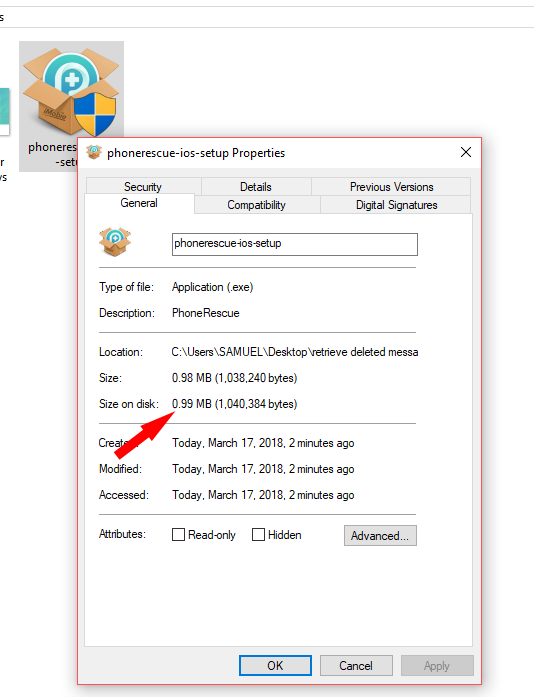
Hence, if you are skeptical about data, you have nothing to worry about. Except of course, you feel just about 1MB is too much which obviously isn’t anywhere close to being the case.
After download is complete, tap on the downloaded .exe file to launch.
If using Windows 10, you will most likely be faced with the option of whether or not, you’d want to allow the app to make changes to your device.
You should click on Yes to run the installation file.
This installation page should appear next.

Here, make sure the I’ve read and accepted iMobie End user license agreement is ticked. Although by default it is, it wouldn’t hurt to be sure. If unchecked, the installation wouldn’t continue.
Next, a download screen will display.

To be candid, this was very fast. Not to be attributed to my internet connection speed, it finished in less than 15 seconds. A little more precise number will be 10 seconds, I think.
When the download is complete, it should display start. At this point, installation of the software, is complete.
Getting Started With The iPhone Recovery Tool
To see what’s in it, I’m going to click on start.

Clicking on the start, the app launches and the next option displayed, is choose language.
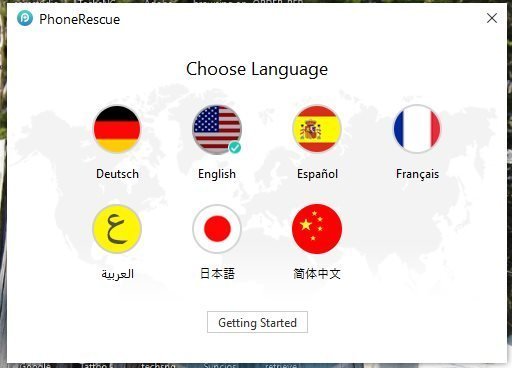
What language do I choose here? ? Deutsch sounds like a plan, right? Just kidding. English it is ?.
By default, English is even selected (look properly at the screenshot above). Next, would be clicking on Getting started. Finally!
PhoneRescue is nice enough to display some quick tips which are meant to get us started.
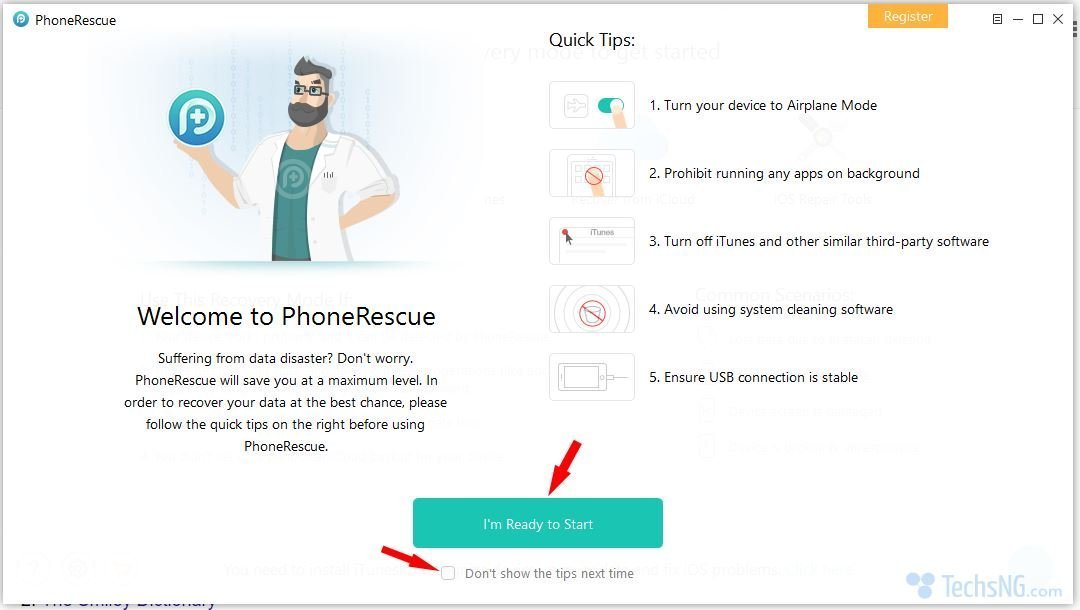
These are the phonerescue tool quick tips being displayed
- You are to turn the device to airplane mode.
- Prohibit running any apps on background
- Turn off iTunes and other similar third-party software
- Avoid using system cleaning software
- Ensure USB connection is stable.
Have we digested all that? Great!
Just before we dash off to click I’m ready to start, would you want to be presented this quick tips anytime you launch the software? If no, tick Don’t show the tips next time beneath the I’m ready to start option.
If however, you’d like to be reminded of the quick tips every time, do not tick it. Either-ways, let’s click on I’m Ready to start. Shall we? Yes, we shall. I know that’s not a word but, let’s assume you get the drift ?.
Recovery Modes Available On The Tool
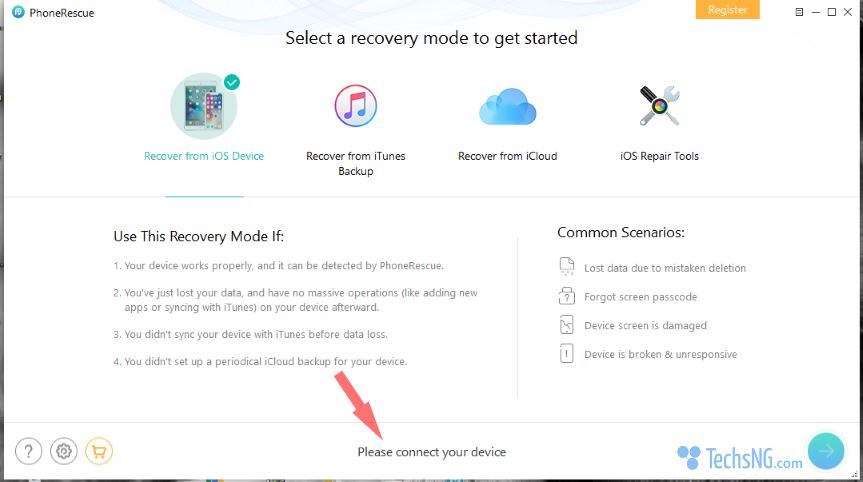
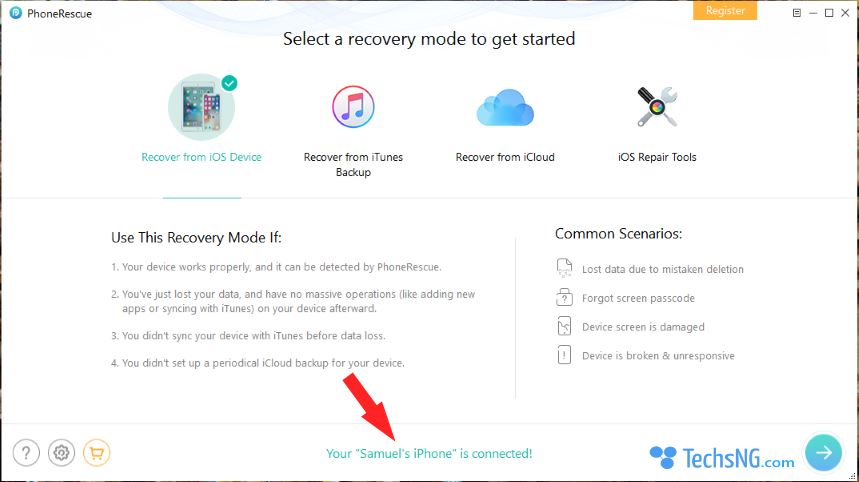
Clicking on that, you are presented the recovery modes available on the app.
The recovery modes available are;

- Recover from iOS device
- Recover from iTunes Backup
- There’s Recover from iCloud and,
- iOS Repair Tools
How about we analyze these tools a bit more based on what the software says. Shall we?
Recovery from iOS device
This recovery mode is said to be necessary in cases where your iPhone works properly, and it can be detected by PhoneRescue.
It is also necessary when you’ve just lost your data, and have no massive operations (like adding new apps or syncing with iTunes) on your device afterwards.
If perhaps, you haven’t backed up your iPhone with iTunes before data loss, this mode can be useful.
Still on back ups, it is useful if you didn’t set up a periodical iCloud backup for your device.
Common Scenarios are said to be;
- Lost data due to mistaken deletion
- Forgot screen password (this sounds catchy. It will really be nice to try out. What do you think?).
- iPhone screen is damaged
- iPhone is broken and unresponsive
OK, Should be really go through others? It will really be time-consuming, right?
If you care to read other recovery mode options and areas of necessity, simply place your cursor on the respective recovery modes and you can read them. You are welcome to continue with us when you are done.
Left to me, we’ve found the recovery mode necessary for being able to recover deleted text messages.
The tool just like every other iPhone tool I’ve used in the past, requires you to have iTunes installed.

I use to have iTunes installed on this computer till the windows OS got corrupted and fixing it had to automatically clear every installed app.
If you do not have iTunes installed, click on the option that states click here (see image above) just after the notification stating the need for iTunes.
Clicking that, you will be requested to download iTunes.

To download, simply click the download button. This will really take some time. The last time I checked, iTunes file was over 200MB.
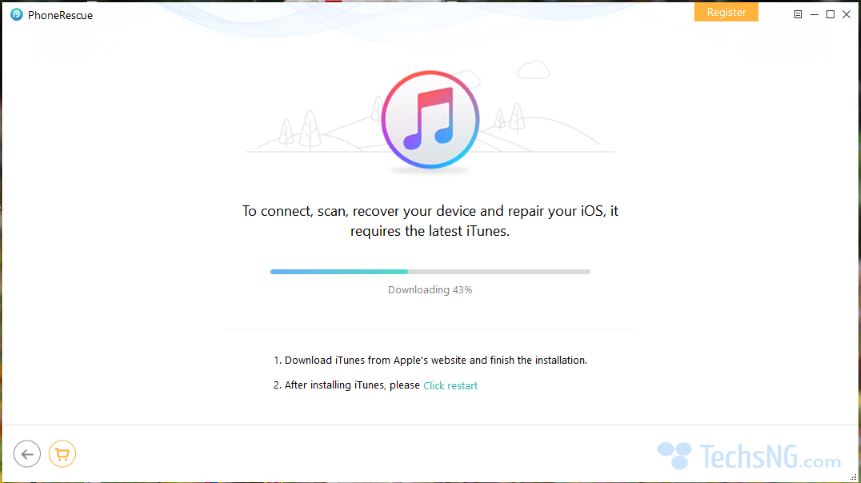
If you’ve got iTunes already installed on your system, you are good to go. Please, kindly wait for us to download our iTunes and we’d continue when the download and installation is complete.
Thank you for your understanding ?.
Installing iTunes
Turns out our iTunes download is complete. Installation isn’t automatically done by the app hence, it’s necessary we install the program ourselves.
By default, after the download is complete, the option to install the software should be displayed.

You should click on Next. Leave the options as it is in the next screen or change to your wish. Thereafter, click on install (displayed on the next screen).
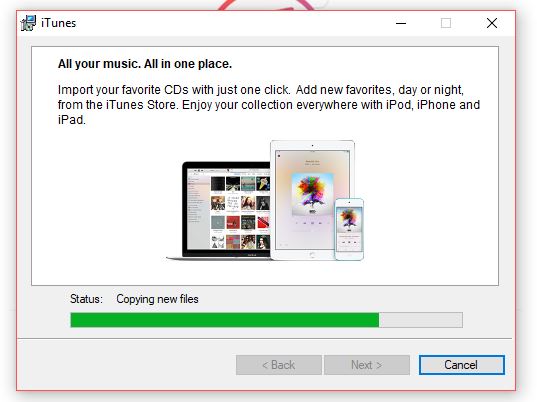
After a few minutes, the installation should be complete. To be certain, wait time here is about 3 to 5 minutes depending on your machine’s specs.
When installation is complete, untick the option which states Open iTunes after the installer exits. This is done inline with phonescue’s quick tips.
At this point, the PhoneRescue software will automatically close itself. You’d have to launch it again. Relaunching should be done using the automatically created shortcut on your desktop. Or, go to start on your windows and click on PhoneRescue. Do not use the downloaded .exe in this case.
Having past the tool’s first start-up stage, it will be requested that you please connect your device. In this case, an iPhone.
But before we do that, what do you think we should do next at this point?
Delete A Text Message On The iPhone
That’s it. I’m going to delete a message or a couple of messages first before connecting the phone to the computer. Make sense, right?
After all, the aim here is to have the app help me retrieve these deleted messages, right?
Just before I do that, I currently use a 16GB iPhone (sucks, I know!). The iPhone is seriously running out of space hence, no back up to iCloud is being done or can be done.

Apparently, I can’t even update the software except I do a lot of file clean up. Enough in this case, would need to amount to about 2GB+.
More so, since I just installed iTunes, there isn’t a way I must have back up my iPhone to my computer, right? Good! That means I currently have no back up file, correct?
Now, let’s see how exactly, this app works.
First, the deletion.
That GIF clearly shows me deleting a few text (short message service) messages on the iPhone. I hope you took note of the messages.
Now, we will try to retrieve them using the software.
Process To Retrieve Deleted Text Messages On iPhone
Step 1: The first thing according to the quick tips above, is to put the put the phone on airplane mode.
I guess this is aimed at avoiding sudden calls while the phone is being worked upon by the app.
Step 2: Using an original iPhone USB cable, connect the iPhone to the computer.
Step 3: The option to unlock the phone and tap on the trust option on your iPhone is needed.
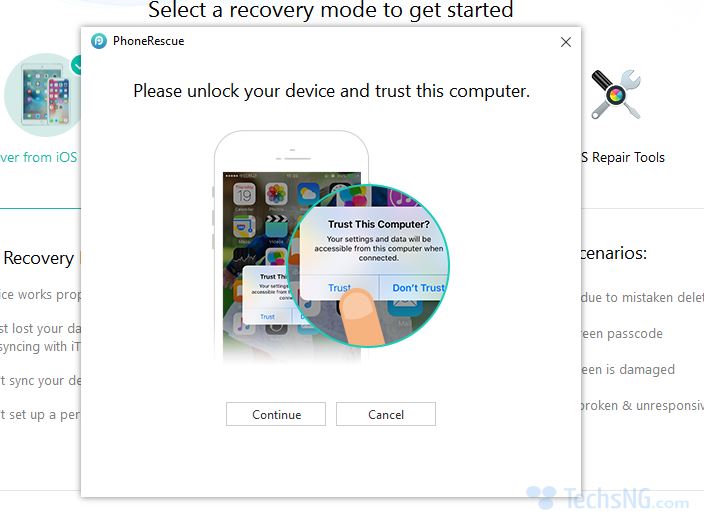
Having tapped the trust option, you will be required to enter your password. This password is to be typed on your iPhone (assuming you have one set).
When done, click on computer on the app on your computer. Again, you shouldn’t run iTunes while using the app.
At this point, it will display that the iPhone is connected. In my case, it says Your “Samuel’s iPhone” is connected.
Step 4: Click on the next arrow icon at right side of the bottom page and a list of file types to be recovered will be displayed.
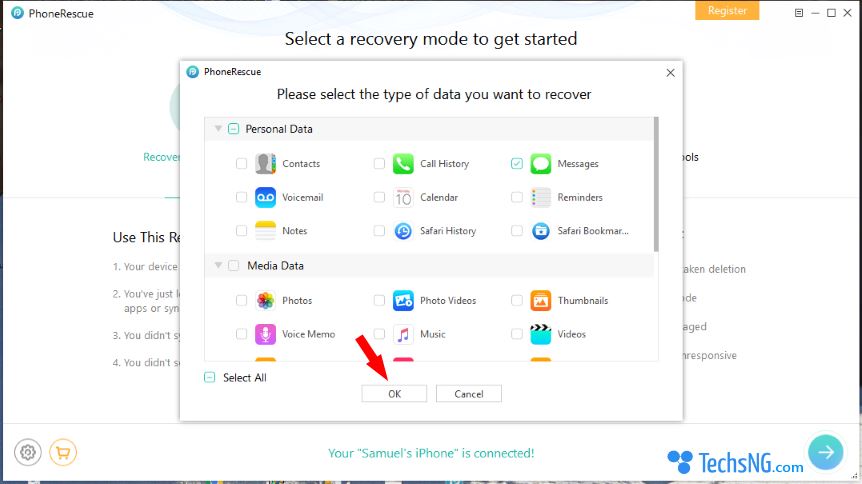
Since we aim to retrieve just SMS messages in this tutorial, let’s untick the rest and leave just the messages.
On a side note, it’s actually interesting to know that the app allows not only the recovering of messages, but also contacts, call history, notes, media files and app data. Really cool stuff!
Step 5: Having unchecked every of the options leaving only messages, click on OK (as indicated in the image above).
Step 6: Uncheck Encypt local back up on iTunes. Upon clicking OK, you’d most likely receive a notification asking that you please Uncheck the “Encrypt local Backup” option on iTunes to allow PhoneRescue to back up your phone.
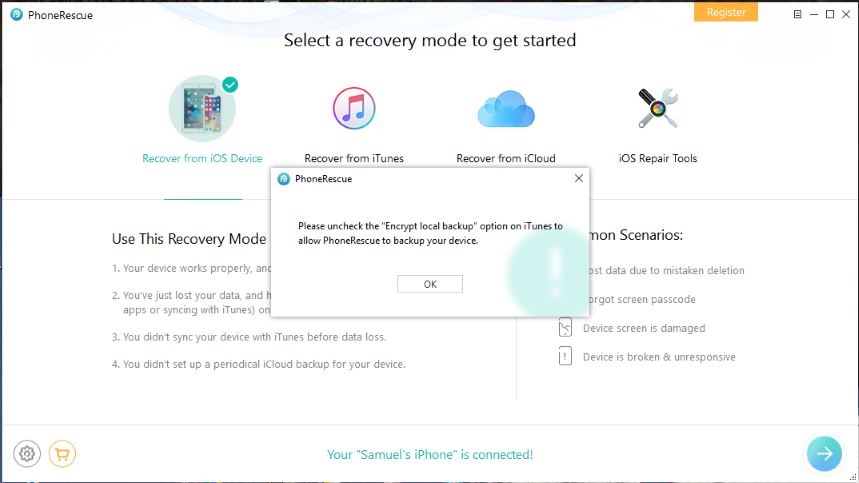
This is only the case if you at some point, backed up the iPhone to your computer and set a password for the back up file. If you haven’t at any point, backed up your phone using iTunes and setting a password, this error wouldn’t be displayed.
In a case where the error is shown, click OK.
To uncheck Encrypt local back up, I would suggest we follow these steps together
- Close the PhoneRescue app
- Disconnect your iPhone from the computer
- Launch iTunes
- Agree to the license agreement if it’s your first time launching the app after download or re-downloading.
- When the iTunes app fully loads up, reconnect the iPhone to the computer Via the USB cable.
- Click on the phone logo close to the top left side of the page.
- Under back ups, uncheck Encrypt iPhone back up.
- Enter the password you initially used in saving the back up and click on OK.
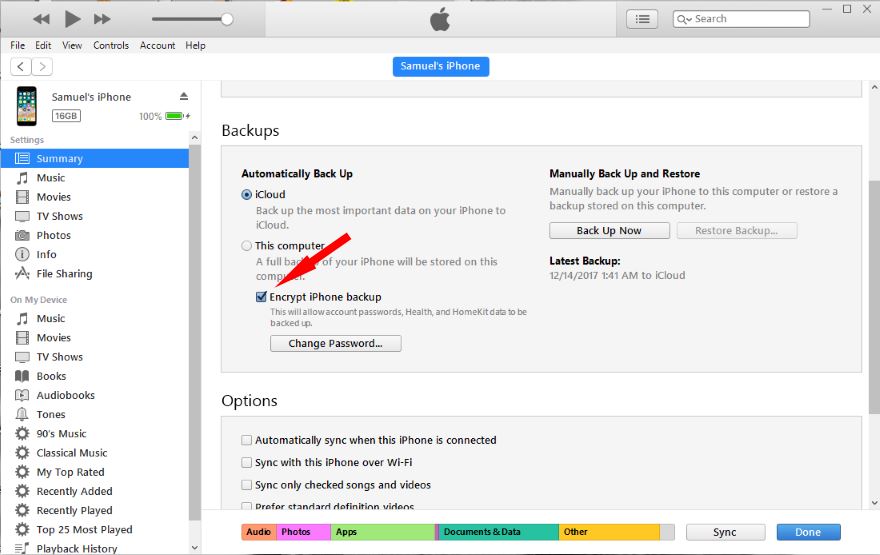
According to the screenshot above, it states I last backed up my iPhone on the 14th of December, 2017. I’m not sure, but using my iPhone password worked in decrypting the iPhone backup file.
Step #7. Close the iTunes app, remove the phone from your computer, relaunch the PhoneRescue app and reconnect the iPhone to the computer via USB cable.
Step #8. After device is connected to the computer, again, click on the next arrow button same as Step 4 above.
Step #9. Again, uncheck every of the personal data recovery option, media and apps data leaving only messages (same as part of step 4 above). Thereafter, click OK.
At this point, the PhoneRescue app or software should begin analyzing your iPhone.
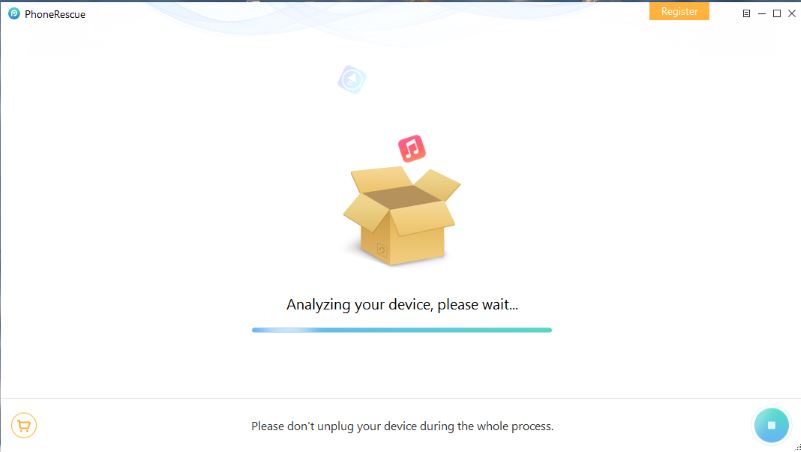
You shouldn’t unplug your device during the whole process.
When the scan is complete, it states that the trial version only displays parts of your lost data, but if you registered, it will display the complete data.
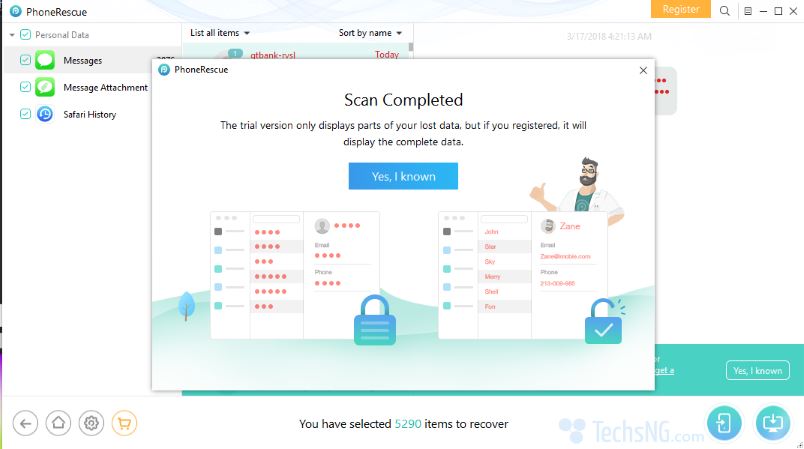
Step 10: Click Yes, I known know.
At this point, the list of deleted messages and recoverable messages should be displayed.

If you go through the above gif message where I displayed the deleted message, you’d realize I deleted 3 messages for the sake of this tutorial. One from dstv, one from vconnect and another from a shortcode.
Looking at the screenshot above, the tool was able to recover that of DSTV and vconnect. I can’t seem to find that of the shortcode. Perhaps, I’d have to search through.
Step 11: Select all the text messages you’d like to recover back on your iPhone. When done, click on the recover to phone icon.

Next, you’d be displayed an option to enter a license code, buy a license code or choose the latter option. You can get a license code from the Software’s Official website.
Since I have a license code, I’d choose to enter license code option.

After entering the license code, I’m asked to turn off Find my iPhone feature.
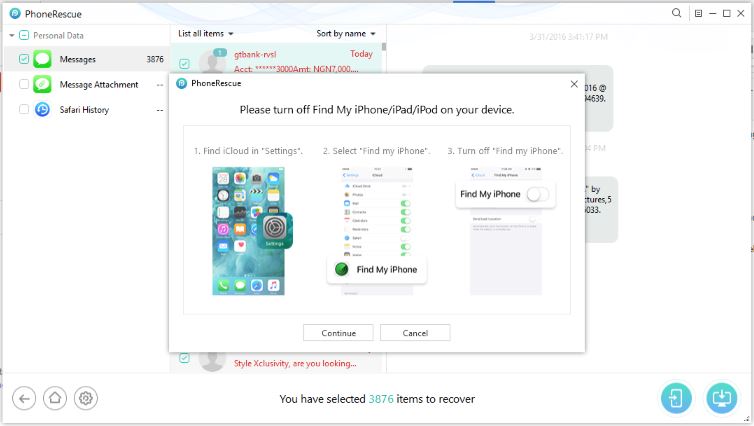
To turn off find my iPhone feature, follow these steps:
- Go to Settings
- Tap on your ID (using iOS 11)
- Tap on iCloud
- Scroll down and tap on Find my iPhone
- Toggle the Find my iPhone OFF.
Step 12: After turning off Find my iPhone, click continue on the PhoneRescue interface.
Step 13: Confirm you’d want to recover text messages to your iPhone by clicking on Recover
Next, the recovery process should begin.
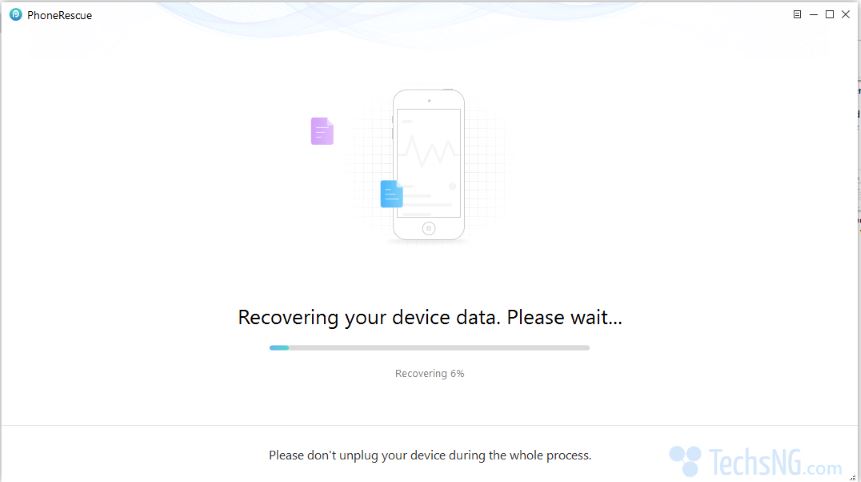
Remember not to unplug your phone during this process. Doing so could affect more files.
Your iPhone could display restore in progress during this process. That’s also safe too. When the restore process is complete, the iPhone will automatically reboot. Don’t fringe. It’s safe.
Wrapping Up
This tutorial may seem very long. It obviously is at almost 3000 words. But, that’s because this is a complete beginner’s guide. I expect every beginner even one who doesn’t know how to install a software on a computer, should be able to work with this.
If you think otherwise, i am more than happy to share your suggestions in the comment session and I will work on making it better.
The content being this lengthy doesn’t mean the process is very hard. After your first try, subsequent trials will be very easy and simple. Trust me.
That’s it. That’s how to recover deleted text messages on iPhone. Questions? Do ask using the comment session.


")
 On Instagram – Complete Guide")


